Hi all,
Normally I develop my code with Visual Basic 2010 Express. But today, I want to learn something about C#. So I downloaded Visual C# 2010 Express, installed it and open it.
I tried to do it the same as in VB however no luck. After some time I found out what I had to do. And here it is:
On page 21 of the "Revit 2011 API Developer Guide.pdf" you can find the first source code for HelloWorld. I did the steps, copied the code, build the program, created the right .addin file and so on. But still it did not work. The button was there, but when I hit it nothing happens...
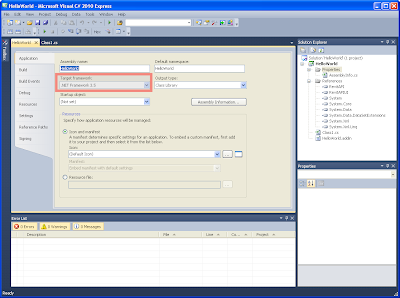
Just check the following:
When you open the Properties of your project, the Application tab shows what Target framework will be used. In my situtation .NET Framework 4.0 had been set.
I changed it to .NET Framework 3.5 and now this simple extension works. Finally
RevitToday
This blog is about: Revit Structure, NavisWorks, BIM, Construction
Friday, October 29, 2010
Wednesday, October 13, 2010
Property palette disappears and Project browser part far too large
Hi,
I am working on a laptop and in the office I have two monitors attached to it. This all works fine, but for some reason the Property palette totally disappears and the Project browser palette is so big that I can not see the edge of it....???
So, I tried to use the Repair Software and Reinstall Software functionality, but they did not help.
Therefore, I looked into the Registry (regedit) and here is what I did:
1. Exit Revit 2011
2. Go to
HKEY_CURRENT_USER\Software\Autodesk\Revit\Autodesk Revit Structure 2011\Components\Panels
2. Select PropertiesPalette, press Change and Paste this into it:
L,0,0,0,1.000000,220,1721,470,300,300,N
3. Select ProjectBrowser, press Change and Paste this into it:
L,0,0,0,1.000000,220,1721,470,300,300,N
4. Close the Registry
5. Start Revit 2011
Now, both palettes will appear on the left side of your Revit screen. Success!!!
Friday, October 1, 2010
Import coordinates into Revit 2011
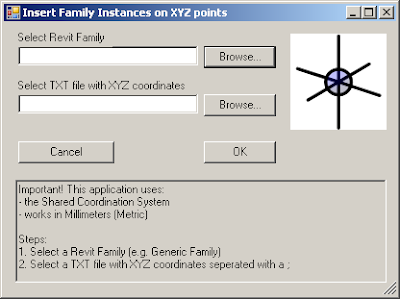
I updated the Revit 2010 extension for importing coordinates from a TXT file. You are free to select a family of your own. It should be a Point Based family of course.
You can download the extension here.
(It has been compiled for Windows XP 32 bits)
You can download the extension here.
(It has been compiled for Windows XP 32 bits)
Wednesday, September 15, 2010
Export XYZ from Revit 2011
This extension for Revit 2011 exports all coordinates of Point Based Generic Models to an Excel file.
You can locate Point Based Generic Models in your whole model. You are able to nest such a Family within another. These points are exported as well when you make this family Shared.
Be patient, do not click anywhere in the Excel file untill you will receive a message that the export is ready!
You can locate Point Based Generic Models in your whole model. You are able to nest such a Family within another. These points are exported as well when you make this family Shared.
Be patient, do not click anywhere in the Excel file untill you will receive a message that the export is ready!
You can download it here. (It has been compiled for Windows XP 32 bits)
Tuesday, July 20, 2010
Can not delete Subcategories in Imported Categories
Sometimes it happens that Subcategories are not deleted when you remove the DWG from your project or family. In the Visibility Graphics these Subcategories are stored and there is no way to purge this (even through Object Styles and remove it does not work). How to erase these items...
- Start AutoCAD
- Create a drawing with the exact same Layer names as you can find in the Subcategories
- Draw on each Layer a Line
- Go to Revit
- Import this AutoCAD drawing in your Revit project or family
- Select the Imported drawing
- Use Query and select one of the lines
- Press the button Delete
- Repeat step 7 and 8 for each layer
Tuesday, June 2, 2009
Insert Revit Families using a XYZ text file
It took some time to do this. Finally I succeeded in developing this extension.
This Revit extension reads a TXT file in which the coordinates are seperated with a semi-colons (so a ;) and inserts on these coordinate a selected Revit family.
1. Select the Revit Family (RFA file) that has to be inserted on these coordinates
2. Select the TXT file. This XYZ file has the following format (X;Y;Z), eg:
- 50.8;60.2;1.25
- 43.5;55.8;1.731
3. Press OK
This extension uses the Shared Coordinates and has been developed for Millimeters (mm). If you are interested, just send me an email or download it here.
Whatch out! You have to stop after the last coordinate in the TXT file. So, no extra empty lines after the last coordinate. This has not been solved yet.
PS This extension has been developed for Revit 2010!!!
Add-In Manager for Autodesk Revit 2010
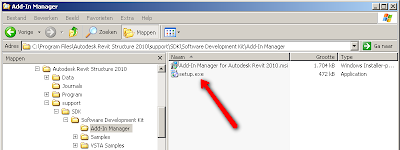
Within the SDK of Revit you can find a very handy tool called the Add-In Manager. With this tool you can manage the Add-Ins easily without manually changing the Revit.ini file.
- Install the SDK (see C:\Autodesk\RST_201_English_Win_32bit\support\SDK or the CD)
- Close Revit
- Start the Setup (for path see the image above)
- Use the default settings
- After installation, start Revit and open a Project
- Go to Add-Ins Ribbon menu, press the External Tools and see that the Add-In Manager is installed properly
Subscribe to:
Posts (Atom)